

Discover space you didn’t know you had by saying adieu to little-used items throughout your home.
We’ve all got a closet that barely closes, or a pantry that’s stuffed to the ceiling with nonperishable items (and yes, that can of beans does have an expiration date). Getting rid of what you don’t need can be a very freeing experience—but it can also be hard to know where to start. Putting your home up for sale is great impetus for a clean out: a home-moving checklist priority should be dealing with clutter so potential buyers don’t consider it a home-buying warning sign and move on to a less-cluttered option.
The scout
If you love that family and friends can rely on you to handle any situation, but your tendency to keep things comes from the anticipation that you might need it someday, you might have a scout’s organization personality. In order to let go, try creating a catch phrase that will help you identify items you no longer use frequently. Try asking yourself, “How often am I really using this?” or “In what situation will I really need this?” You‘ll soon start to realize that you’ll never need a lot of the items you’re holding on to. You can also set boundaries before you begin to declutter. Determine how many of the same type of item you should realistically keep, and then make yourself follow those rules.
Purge old paperwork
Plenty of us keep old tax returns, receipts, mortgage statements from 1992—out of the fear that we’ll need it some day. But be realistic: do you really need the warranty to the microwave you got rid of two years ago? Getting rid of old office paperwork is extremely liberating. Tossing random notes and old checklists and files quickly transforms an office into a place where you can think. Create a box to hold papers that need shredding as you sort, and then shred them while you watch television to make the time go by quickly. When you’ve cut through the backlog of papers, start fresh and shred papers immediately after you’ve sorted the mail.
Shop your pantry
For some people, being prepared means having enough food to feed an army. But the more you store, the more likely you are to forget what you have. In an effort to cut pantry clutter, explore new recipes for a few weeks to utilize what you already own. Avoid buying more nonperishable items until you run out of something. You’ll save grocery money and free up room so you can restock in a more orderly fashion. Make note of how long it takes you to clear out your cupboards, and use that as a guideline for how much food you really need to store in the future.
Restful retreat
Make your bedroom a haven by surrounding yourself with things that bring you comfort and peace. Let go of furniture and other objects in the room that take up space without adding value. If space allows, carve out a nook for a reading chair and ottoman or a chaise. Install artwork or use paint to customize and brighten your space, rather than relying on useless objects.
Organize for your needs
An organized closet can help set the tone for the day ahead. When you can see everything you own, you can find things faster, get dressed with confidence and feel ready to tackle the day. When deciding how you should organize a clothes closet, ask yourself the following: How do I look for things? How do I get dressed? How do I put things away? Sort your items into categories based on your responses. To make things even easier to find, try color-coding items within your categories, and look for cheap storage solutions, such as plastic shoe boxes or bins for belts, socks or scarves.
Declutter and do good
It’s easy to hold on to bath products such as soaps and lotions, especially those received as gifts. But don’t let these items steal prime countertop space or crowd out items you need to access every day. Create a boundary, such as a basket or bin, for “relax” items; when it’s full, follow a “one in, one out” rule. Have extras worth sharing? Local shelters are always looking for supplies.
Play stations
When toys, books and dress-up clothes have proper homes, children can participate in the cleanup process and help keep clutter to a minimum. Consider dividing a bedroom or playroom into activity stations to create clear separation. Make sure children have easy access to items they gravitate to frequently, such as a basket for books. Avoid oversize containers that make it hard for children to find toys, and keep lids to a minimum—except on items you want to control access to, such as art supplies.
Source: www.bhgrelife.com

You can create a home office anywhere—but it helps to have a plan for corralling clutter and organizing your workspace first.
Look beyond the boring cubicle walls and get inspired to create a home office that’s just that: part of your home. You don’t need a whole room reserved for an office (although that would be nice!); a desk, a chair and some good organizational and storage strategies are all it takes to carve a nook out of your home for an office.
Corner office
A fully functional home office doesn’t need to have its own separate room. Tuck it into the corner of a dining room and give plenty of storage and ample work surfaces. Use space wisely by installing shelves above the desk and cabinets below the work surface.
Write away
If your office needs are more sporadic, consider a simple writing desk for the occasional bill-paying sessions or mail sorting. This writing area is stylish but serves the function of an office as needed.
Compact office
A handsome secretary can turn any room into an office. Paint it to match the bedding and draperies and it will blend into a cottage-style bedroom while providing a spot to write and a place to store stationery, books and more.
Color coordinate
Put your walls to work in your home office space. Floating shelves can be stacked with binders, magazine boxes and more. Wall-mounted baskets are an easy way to file mail or to-do tasks.
Perfect office setup
Create a corner office at home by zoning a section of a larger room (such as a living room or family room) as a work zone. For more storage, hang floating shelves along the wall. When planning your home office, make sure there are adequate outlets nearby for computers, printers and task lighting.
Inspiration point
Surround yourself with beauty while you are hard at work. Hang art that you love above your desk, or add a few decorative items to your desktop. Improve function by adding a pretty lamp or wall sconces for better lighting.
Pretty space
Old desks often have plenty of drawers and storage, but might not be up to par in the style game. Paint a secondhand desk a fresh color that suits your room’s style.
Smarter office storage
In a small space, take office storage to the walls to keep work surfaces clutter-free. In this space, cubbies were mounted to the wall and magazine holders were screwed into the bottom of the cubbies for an innovative mail sorter. For an easy and affordable work surface, transform a slab door into a desktop by mounting it to a wall and placing bookcases or file cabinets beneath it for support.
Kitchen office
A small desk tucked into a kitchen is suited for many tasks, such as doing homework or jotting down a grocery list. Incorporate a few drawers and cubbies to maximize the space’s storage capacity.
Office with a view
Bump a desk up against a window with a deep windowsill and use the sill as an improvised shelf for baskets and boxes. Plus, placing a desk near a window provides plenty of natural light.
Cozy work space
Turn an awkward closet into an office with a few quick changes. Remove the closet doors and paint (or wallpaper) the interior. Hang shelves along the wall and tuck in a desk for a quick-fix office that packs efficient function into a small sliver of space.
Build a desk
For a simple, do-it-yourself desk, employ sturdy file cabinets as a base and a large desktop, or painted panel, as the work surface. Position the desktop on the file cabinets and screw into place.
Living-room office
Inconspicuously add an office to a living area with a few simple tricks. Incorporate as much concealed storage as possible without distracting from the rest of the room. Take steps to add in elements to tie the space to the rest of the room. A bamboo chair and burlap-covered bulletin board harmonize with the living room’s natural look and help the office adhere to interior-design principles.

Curling up with a good book is the perfect way to relax. Every bookworm can agree that where you read is just as important as what you read. We can all relate to reading the same sentence for 15 minutes as a result of being in the wrong place. Noisy, crowded and uncomfortable are not adjectives one wants to use to describe their leisure spots. Reading nooks are little areas within a home that are comfy, cozy and free of distractions. Explore the must-have elements every reading nook needs.
Get Cozy in a Corner
You may think you need a lot of space or to rearrange for a reading nook. All you need is a little corner or any space that is secluded from everything else. Reading nooks can be anywhere; consider a corner in your bedroom, a bay window or even a shed.oftness is a Must
Increase the coziness of your reading nook with softer fabrics. Invest in a plush blanket to create a welcoming cocoon. Paint the walls softer hues to ensure a cozy, distraction-free space. If a big rug beckons, consider faux fur or a great shag rug to spend a few hours with your favorite author.
Softness is a Must
Increase the coziness of your reading nook with softer fabrics. Invest in a plush blanket to create a welcoming cocoon. Paint the walls softer hues to ensure a cozy, distraction-free space. If a big rug beckons, consider faux fur or a great shag rug to spend a few hours with your favorite author.
Comfort with Cushions
Soft fabrics are great, but they won’t give you as much comfort as you need to finish a few chapters of your latest read. Grab some cushions and layer them on the floor, bench or bay window. They are a much cheaper alternative to purchasing a chair. You may also want to purchase larger pillows to line the wall for increased comfort.
Lighting is Vital
A reading nook in front of a big window is always a nice addition. You get an ample amount of natural light, fresh air and peace. The only catch is when the sun goes down, your reading nook will no longer be the ideal place. To get the best light possible, add a lamp or hang a few strings of white lights. Better yet, opt for a with a dimming option to set the mood as you please.
Keep it Simple
Too many distractions can take away from your reading experience. There’s no need for tech gadgets, save for an e-reader. An abundance of framed photos, home décor and other distractions can also take your attention away from the page. Keep it simple by sticking with basics to get the most out of your reading nook.
Source: www.bhgrelife.com
People often assume that the kitchen or living room is at the heart of the home, but when you see these ideas to help corral the chaos in your mudroom, you might decide that the area just inside your front door is the true command center of your house. If you don’t have a dedicated room or hallway carved out for a purpose-built mudroom, don’t despair: a few hooks, storage baskets and designated shoe racks can make all the difference in a house where multiple family members use—and abuse—the front hallway as a dumping ground. Good mudroom design can be just what you need to corral clutter and get an entryway you—and potential home buyers—absolutely love.
Establish a mudroom zone
Even homes with grand entries sometimes find themselves challenged by the lack of front- or back-door space to store daily necessities. A few options can help. A slim drawer underneath a bench offers a spot to stash seasonal items. With no room for traditional shoe storage solutions, boots and other footwear sit close by; place them in a tray to catch loose moisture and dirt. A tray makes it easy to clean up melted snow or mud that comes in on boots; simply take the entire tray outside to dump accumulated dirt or snow, then replace.
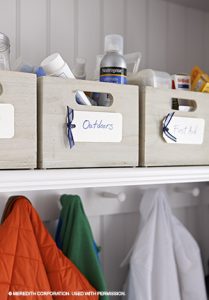 Use baskets for outdoor items
It makes sense to have some items close at hand for out-of-house comings and goings. A shelf above coat storage in this mudroom has space for containers with various items such as sunscreen, bandages and more. Keep similar items, such as bug spray, together and label the containers (adhesive or tied-on tags work well). You might also consider assigning a basket to each member of your family, then letting them use it however they like to corral their personal clutter
Tuck shoes out of the way
Although it’s handy to have all mudroom storage together, sometimes a dedicated shoe-storage solution just isn’t feasible. Instead, carve out nooks and crannies where you can. A small recessed area offers a just-right spot for multiple shoe shelves.
Sliding shelves are a useful tool in mudrooms, too, helping to streamline access to items. Choose heavy-duty, easy-to-clean surfaces in a mudroom, particularly for the floor, that rely on color and texture to mask any messes or daily dirt. And don’t forget to put a tray under a shoe rack to catch the debris from several rows of shoes above.
Use extra storage for essentials
Some mudrooms are hidden and expansive enough to store more than just coats and shoes. For peculiarly shaped items that may not easily stay grouped—toilet paper, for example—use decorative baskets (lidded or not) to keep them in order.
Source: www.bhgre.com/bhgrelife
Simple ideas so you can enjoy your home despite the dust and chaos of remodeling.
Congrats! You finally got that fixer-upper you’ve been eyeing like you used to do to your high-school crush. Now it’s yours, but your budget’s tight, so you’re planning to move in and live there as you remodel.
Wow, that’s a stressful thought. Just thinking about it makes you feel exhausted and excited at the same time. Sigh. Well, you can let your excitement win that battle with these four strategies to ease the stress of living in the middle of a construction zone:
#1 Designate a Place for Stuff You Need to Move out of the Way
Homeowners ride an emotional roller coaster during a remodeling project, says Dave Lupberger, veteran remodeler who wrote the book, “Managing the Emotional Homeowner.”
To give your emotions some grounding, come up with an organization plan. It’s a lot easier (less stressful) to renovate when you’ve got the room.
Think about it:
Where are you going to put your piles of pots and pans until your kitchen cabinets are ready?
Set up a storage place that’s reserved for stuff that needs relocating as you move from project to project. Such as:
- Install an organization system in the basement or garage.
- Reserve one room (future guest room?) if you can.
- Rent a pod; you can even keep it at your home.
For items you’ll need to use more frequently throughout renovations, build shelves in closets or create storage space under a window seat or banquette bench.
#2 Make the Space You'll Live In a True Retreat
Maybe your master bedroom or kitchen will need a total remodel in a few years, but other rooms of the house need more attention now.
Because you spend the most time in your bedroom and kitchen, take this opportunity to make at least one of them really cozy with a quick makeover before diving into any heavy-duty projects elsewhere.
The fastest way to change a room is with paint and accessories. Use paint to create an accent wall in your bedroom and try your hand at crown molding to make a room seem polished. You can even add new lighting for ambiance.
In the kitchen, paint the cabinets, add new hardware, and — voilà! — you have a new kitchen. Install a backsplash over a weekend, and one of your most commonly used rooms will feel peacefully polished — even if there’s chaos right down the hall.
#3 Make a Door One of Your First Projects
Your new home might be a mess inside, but you can feel great about pulling into your driveway.
A new front door, or newly-painted one will remind you how much of an impact your work is making on your home. And give you a reason to smile as you walk through the door.
#4 Create Outdoor Places to Escape to
Have a spring move in?
If you have months of good weather ahead, take advantage of your new yard to create a retreat where can truly get away from the clamor of renovation project. Some simple ideas:
- On your patio or deck, go ahead and “furnish” it — even if it’s just a few lawn chairs.
- Create a picnic spot on a nice shaded spot.
- Hang a swing.
- Turn a shed into a temporary hideout
By
writes about homes, design, remodeling, and construction for online and print national trade and consumer publications, including “Better Homes & Gardens.” Previously, she was a senior editor at “Remodeling” magazine. Follow Stacey on Twitter.
Visit Houselogic.com for more articles like this. Reprinted from Houselogic.com with permission of the National Association of REALTORS.
As a homeowner preparing for a sale—or simply trying to stay on top of keeping your home clean—housekeeping can be a real chore. To help maintain a clutter-free and spic-and-span house, check out our tips guaranteed to satisfy your need for cleaning speed.
Create a Tool Tote
Keep everything you use to clean your home ready to go in one cleaning tote, caddy or bucket. If you’re suddenly confronted with preparing for unexpected guests, you won’t waste time gathering your necessities to start or continue—just bring it with you from room to room. If your home is large, consider creating two or more: one for each level.
Ditch the Broom
You don’t have to switch from a broom to a vacuum when you clean, says Jackie Harmon, owner of Healthy Clean green cleaning company. “Use a vacuum on all floor surfaces.” It’s quicker to use, plus you’ll remove one lanky, awkward tool from the mix.
Buy an Extension Cord
Invest in a 50-foot extension cord for your home’s vacuum, says Matthew Ricketts, president of Better Life Maids. “Plug in once, in the center of the floor, and you’ll be able to vacuum even a large home without wasting time un- and re-plugging,” he says.
Dust as Needed
That thimble collection or brass animal display needn’t get a complete wipe-down every single week. Save time by giving yourself the OK to skip the little stuff and instead focus on the big picture. Treating wee things to a good dusting once a month is just fine.
Develop a Routine
Establish a cleaning pattern to consistently shave time off your cleaning routine. Experts recommend starting each room to the left of the doorway, at the top, and moving clockwise and down. Once you get the hang of your system, you’ll clean speedily on autopilot—and never waste time backtracking.
Conquer Clutter
Cleaning goes much more quickly if you don’t have to de-clutter along the way. Make sure each family member has a catchall spot for personal things in your home. Cubbies, tote bags and small laundry baskets all work. They should be emptied regularly. Make a rule: If it’s full, its owner needs to trash, donate or find a permanent home for all contents.
Clean as You Go
To save time on cleaning day, clean as you go whenever possible. To that end, stash a few key cleaning supplies in each room or on each level of your home, says Teresa Ward, owner of Teresa’s Family Cleaning. When messes happen, it’s a cinch to swoop in, swipe and move on.
Spot-Clean the Shower After Use
Use a squeegee on the shower walls and door after every use, says Molly Maid president Meg Roberts. This quick, immediate act saves time battling soap scum and water spots later. Bonus tip: Keep the shower door slightly open after use to promote airflow and hamper mildew buildup.
Do One Thing at a Time
If you truly want to speed-clean your house, put the phone down. Better yet, tuck it out of sight. And keep the TV off. Focus solely on the task at hand. Multitasking while you clean adds time. Better to get your cleaning done quickly and then move on.
Enlist Help
“Cleaning should not be one person’s responsibility,” assures Molly Maid’s Roberts. Permanently shorten your own housecleaning time by assigning tasks to family members. Even young kids can pick up, make the bed and change out hand towels. Make your expectations crystal clear, and trust them.
Adapted from Better Homes & Gardens. Used with permission. © Meredith Corporation. http://www.meredith.com. All rights reserved.

It’s not unusual to downsize to a smaller home at one point or another; a smaller home is something that many people look forward to and take advantage of as they get older.
You may be wondering if it’s time for you to start downsizing and start a new chapter in a smaller space. Whether you’re an empty nester looking for fewer maintenance requirements or simply interested in a smaller space, there is one thing that is inevitable: You will have to get rid of some of your stuff. This is somewhat bittersweet, but you get a chance to go through all of your belongings and determine what truly needs to make the trip to your new destination in life. Follow these tips to make the downsizing process significantly easier.
List or leave it -The first step to downsizing is to make a list of the things you absolutely need. Items that don’t make the cut shouldn’t come to your new house. It’s important to do this at least three months prior to the move to ensure you have an ample amount of time to go through your items and think about whether or not you need them.
Sort and sell - Once you have determined the items not coming to your new house, you can start getting rid of them. This can be a difficult task, as your items will have different values and varying degrees of wear and tear. Grab three boxes and label them for selling, donating, or throwing out. As you sort through your belongings, you can quickly assign them to the correct box and get rid of them accordingly.
Compare new rooms with current rooms that have similar dimensions - It can be hard to determine how much room you will actually have when downsizing. Get the dimensions of each room in your new house, and compare it to rooms in your current house that have similar dimensions. This gives you the opportunity to see what kind of space you’re working with, and more importantly, what furniture will fit in your new downsized home. When trying to determine what furniture pieces will make the move, look at your new floor plan: determine if it’s plausible to keep those all sofas, or chairs, or if you should part from your old furniture all together and upgrade with newer pieces.
Downsize your kitchenware - If you’re an empty nester, there is truly no need for ten mixing bowls and seven spatulas when you move into your new house. Narrow down your bowls, plates, forks, and spoons to reasonable amounts, and use paper kitchenware when hosting in the future.
Target the garage - Depending on the kind of home you’re downsizing to, you may not need a lot of the items in the garage. If your new condo handles lawn maintenance and snow removal, you can get rid of the shovels, your lawn mower, and possibly even the ladder. Determine what tasks will be taken over by someone else when you make the move, and sell any equipment you will no longer need.
Downsizing your home can be an emotional task. It can also be just as exhilarating. Follow these tips to de-clutter and reorganize your belongings as you head into a new chapter in your life.
Reprinted from www.bhgrelife.com
You're immune to the dirtiest places in your home. But your guests aren't. Here's what to do. Admit it: It’s easy to get a little “Judge Judy” inside someone else’s home. We notice gunk on the floor, cobwebs in the corners, and dust on the overhead fan. But guess what? Unless you’re Adrian Monk, you’ve probably got some gunky places that your friends notice, but you don’t. (Sad trombone.) This is why we tracked down a domestic guru to help us with this article. No matter how hard it is to find dirt hideaways on your own, a little expert advice can make it alllll OK. Jan M. Dougherty, author of “The Lost Art of House Cleaning: A Clean House Is a Happy Home,” revealed the seven spots you’re likely to miss — and the best ways to make them presentable, stat: 1. Light fixtures. Look up. Your light fixtures are loaded with dust and dead bugs. Take them down, spritz with a cleaning solution, and wipe clean. Dougherty uses a solution of five parts water and one part Krud Kutter, a non-toxic odorless all-purpose product. (Handy tip: When making the Krud Kutter solution, put the water in first. “Otherwise it’ll bubble over,” she says.) 2. Toilet body. You probably clean your tank fairly often, but what about all the bits and pieces that surround the tank, and the floor itself? For porcelain thrones, Dougherty recommends Soft Scrub with bleach to clean the minuscule cracks that form in the glaze over time. For any non-porcelain parts, she says vinegar will do. Start with the top of the tank and spray all the way around — the lid, under the lid, the seat, down to and on the surrounding floor, and even the walls behind the toilet. 3. Dust collectors. The TV mount, picture frames, computer printer, keyboards, and remotes are great dust collectors. Use a microfiber rag that you’ve sprayed lightly with vinegar to banish it all. Vinegar isn’t electrostatically charged, so dust will take longer to return to that spot. 4.Drawer organizers. Crumbs and dirt love those little compartments. Suck them up with a handy vac, or spray with vinegar and wipe away with a rag. Don’t wait until the crumbs are three inches deep and have taken root in the drawer. If that’s the case, break it down and clean with the Krud Kutter solution. 5.Ice maker. Old ice absorbs food odors, so it’s a good idea to clean and sanitize the whole system every once in a while. Stop the machine from making more ice, pull out the ice bin, and dump the ice. Wash the bin and ice maker with vinegar, or put the bin in the dishwasher if your manual says it’s safe to do so. Wipe the ice maker with a dry rag to remove moisture. 6.Appliance handles. You touch them so many times every day. And you never think about it. Spray them all down with the Krud Kutter mix and then wipe. “One night a week, I take the knobs off the stove, remove the dish and the grease screen from the [over-the-range] microwave, and take the bowl with utensils that sits next to my stove and put them all in the dishwasher,” Dougherty says. “Do this before bed and by the morning you’ve cleaned half your kitchen, yet touched nothing.” 7. Glass and mirrors. Dougherty washes dull, smudged glass and mirrors with straight vinegar. Be aware that if you’ve been using commercial cleaners it may take “four, five, six, maybe seven cleanings with vinegar to get all the wax off the glass,” she says. Bonus tip: “When you go into a room to clean you shouldn’t have to think. You should be able to turn up the music and rock and roll your way around the room,” Dougherty says. She uses a method she calls “The Path” — start in one corner, progress around the perimeter, and then head to the middle. Clean everything in your path as you go around the room. By Stacey Freed Visit Houselogic.com for more articles like this. Reprinted from Houselogic.com with permission of the NATIONAL ASSOCIATION OF REALTORS®
Don’t think of your microscopic yard as a curse. So what if it’s technically a small concrete slab that baaarely accommodates a half-sized Weber grill? Or if your flagstone patio is just big enough for you, a lounge chair, and a good book? Your tiny outdoor spot is actually an opportunity to get creative. To live large with a small footprint, try these functional tweaks to make your minuscule outdoor space feel like a palatial retreat. 1. Divide the Space Wait, what? That’s right. Even if your square footage is relatively small, dividing your outdoor space into two areas can actually make it seem bigger. “Creating a space within a space makes it seem larger because it gives you a separate experience,” says Joy Diaz, chief marketing officer at Land Care Inc. Diaz recommends a small wood pergola, which you can purchase at home improvement stores or even build yourself without too much effort. You can also use walls to divide the space. We’re not talking about bulky concrete barriers here — try using short trellises, arbors, or vine-covered wooden fences to separate your loungers from your patio table. “It says, ‘I’m in one place, that’s another place, and if there’s room for two places it must be big,’” says J. Scott Williams, a landscape architect at YardApes in New Milford, Conn. As an added bonus, walls prevent visitors from walking in a straight line from one end of the patio to another, instead creating a winding path that makes your small space feel expansive. 2. Plant a Privacy Screen A peaceful space always feels roomier than one crowded with noise and other distractions — like the pressure to strike up an awkward conversation every time you lock eyes with the nice lady next door. Keep your evening soirées and morning coffee blissfully secluded with a few cleverly positioned plants. There are a few ways to achieve this goal. Along the very edges of your space, plant a tall, wide bush, like the purple smoke bush, a fantastic, easy-to-care-for container plant that can grow six or seven feet every year. Just be sure to keep on top of trimmings to keep it from overgrowing your patio — you want it growing up, not out — but as long as you do so, it makes an excellent privacy screen. “A larger plant in a small space is dramatic,” says Williams. You can also privatize your patio without sacrificing any square footage with the oldest trick in the book: Install some climbing vines on a trellis to clearly tell your neighbors, “This is my special space.” 3. Add a Water Feature A dramatic focal point can really add some intrigue to a mini yard. And a water feature, like a bubbling birdbath or wall fountain, can do just the trick. Williams suggests choosing an element with a black bottom, which will create a darker surface that reflects sky and trees, making your outdoor space feel bigger. Just make sure your water feature doesn’t overwhelm your porch — you can skip the long, vanishing edge-style pool. “I wouldn’t put a longer element in a small space, which might make it look smaller,” Williams said. “Add a smaller water element into a small space, and make it seem larger.” 4. Use Vertical Space Distract from your lack of horizontal yardage by really maximizing your outdoor space’s most abundant dimension: vertical space. Use your walls, fence, or railings as extra space by adding vines or a living wall filled with flowers, herbs, and other eye-catching greenery. For a simple change, prop an attractive ladder — think barnyard chic, maybe? — against the wall and use its rungs as shelving for plants or other decor. The internet is bursting with other vertical planter and shelving ideas, too, using everything from pallets to chicken wire. “It draws the eye up and outwards, and gives it a green and completely different look,” says Diaz. “It can change the atmosphere of the area. You’ve walked into a different experience from your home — it’s a psychological and emotional change.” 5. Expand Space with a Mirror “Mirrors really make space feel more expansive,” Williams says. On a small porch, place a tall mirror on the ground behind a portico or a patch of greenway, which “makes it look like a doorway into another garden.” You don’t need to go huge on the mirror to have a huge impact. Even hanging a normal-sized mirror, like one you might find over a dresser, can make a tiny space feel much larger. But whichever you choose, make sure to weatherproof your mirror first using a mirror edge sealer (you’ll also want to add sealant to the frame, especially if it’s made from wood) to prevent moisture damage — unless you like the weathered look, that is. Small spaces don’t have to be limiting. With a little bit of creativity — and perhaps a reflective surface or two — there’s no reason you can’t feel like you’re living in your very own Versailles. By: is a writer and editor with a focus on home improvement and design. Previously, she worked as a web editor for "House Beautiful," "ELLE Decor," and "Veranda." Visit Houselogic.com for more articles like this. Reprinted from Houselogic.com with permission of the NATIONAL ASSOCIATION OF REALTORS®
Planting one tree isn’t a huge effort. You’ll be helping our planet, too. Plus, once the tree is established, it’s about as low maintenance as a landscape can get — and the difference it can make to your yard lasts for decades. The key is to choose a tree that adds interest to your landscape in the form of color, shape, and texture.
There are a ton of trees to choose from, but to play it safe, try a Japanese maple. Many are suitable for most any climate. They all offer color, form, and texture that can liven any landscape.
 Related: 11 Trees You Should Never Plant in Your Yard
2. Tap Into the Colorful Punch Mulch Can Make
Mulch is one of the easiest ways to add both color and texture to the entire yard. “Next to a green lawn, coffee bean-colored mulch is a great contrast,” says Paul Fraynd, owner of Sun Valley Landscaping in Omaha, Neb.
If a dark roast isn’t your preference, there’s a a multitude of mulch colors that can spice up your bland landscape. Red, black, gold, cedar-toned — you choose.
For something truly unique, try pine cones. They introduce a knotty texture that breaks up the monotony of flat lawns and box-like shrubs.
The point is that mulch is easy: Choose a cool color and texture, then dump it, spread it, and forget it.
“Keep it away from wood or siding, though,” warns Fraynd. “It can rot the wood and may attract insects.”
3. Get Edge-y
Look along your walkways and garden beds. If your lawn just seems to morph into your shrubbery or threatens to take over your front walk, some unique edging could perk up your yard. No pruning, cutting, or watering required.
Define a walkway with some personal or found items, says Missy Henriksen, vice president of public affairs for the National Association of Landscape Professionals.
“Colored hockey sticks can line a path or wine bottles planted neck down in the soil,” just make sure you do the entire path. “Two or three wine bottles lining a path might look like leftovers from last night’s party,” she says.
If you want to keep it all in the plant world, low-maintenance ground covers are an excellent choice for edging, she adds. Try lily of the valley, vinca, lamb’s ears, and pachysandra. Some of these add color, others texture, she says.
4. Create a Focal Point That’s All About You
Your own passions and pleasures are great inspiration to add color and texture to your landscape. Try creating a focal point with something that brings back a happy memory, says Henriksen, like your old toy truck, tricycle, or wagon. Turn it into a colorful planter.